Mater Desgin1 中的按钮有一个非常舒适的点击效果,跟着这篇文章一起实现出来。
原理
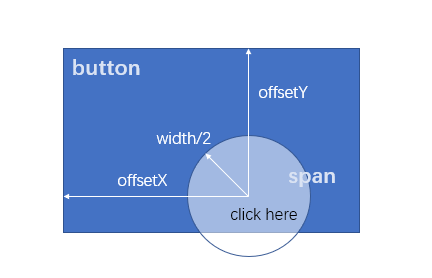
这个原理其实十分简单,在鼠标按钮点击时,我们在点击位置生成一个半透明的圆,圆逐渐变大变淡,以此达到水波荡漾的效果。
样式和结构
在 button 里动态添加 span 元素表示波纹。
<button class="button" type="button">点击它</button>span 相对 button 绝对定位。
在开始时将其缩放为 0,然后为其应用一个变成完整大小的动画。
.button {
  position: relative;
  ...;
}
/* 波纹 */
.button-ripple {
  position: absolute;
  border-radius: 50%;
  background-color: rgba(255, 255, 255, 0.7);
  transform: scale(0);
  animation: zoomIn 500ms linear;
}

@keyframes zoomIn {
  to {
    transform: scale(1);
    opacity: 0;
  }
}
点击逻辑
在点击按钮时,点击事件的参数的 offsetX 和 offsetY 属性对应鼠标相对 button 的点击位置。用这个位置信息减去圆形波纹的半径即可得到波纹元素 span 距离父元素的 left 和 top。
波纹的大小取多少合适呢?
波纹需要在最大时完全覆盖按钮,所以波纹的半径应该是点击位置距离按钮的四个角的距离的最大值。这里直接简单使用 button 的对角线长度作为波纹半径,span 的宽高就是半径的 2 倍。

点击会生成一个新的 span,所以如果原本已存在 span,应该将它删除。
const { clientHeight, clientWidth } = $button
const r = Math.sqrt(clientHeight ** 2 + clientWidth ** 2)

$button.addEventListener('click', (e) => {
  const $ripple = document.createElement('span')
  $ripple.className = 'button-ripple'
  $ripple.style.height = `${2 * r}px`
  $ripple.style.width = `${2 * r}px`
  $ripple.style.top = `${e.offsetY - r}px`
  $ripple.style.left = `${e.offsetX - r}px`

  const $last = $button.querySelector('.button-ripple')
  if ($last) $last.remove()

  $button.appendChild($ripple)
})
最终效果
See the Pen 水波纹按钮 by lxchapu (@lxchapu) on CodePen.
参考
-
Material Design 是由 Google 设计师和开发人员构建和支持的设计系统。 ↩